Simplify your React programming effortlessly with these 8 amazing hooks
React Hooks
Table of contents
In 2019, React introduced a game-changing feature called hooks, which revolutionized how developers handle states in React apps. Hooks simplified state management in both class and functional components, making development much easier.
With hooks, we no longer need lengthy lifecycle procedures in class components, and instead, can use a more direct approach to state control within functional components. This has opened up new avenues for code reuse, component composition, and streamlined logic.
Now, let's dive into the exciting world of React hooks and explore popular ones like useState(), useEffect(), and useContext(). These hooks have become essential tools for managing state and performing side effects in functional components.
By mastering these hooks, we can supercharge our React programming skills and unlock the full potential of our projects. So, let's embark on an exhilarating journey into the world of React hooks!
Prerequisites
Basic understanding of JavaScript programming language
Download an IDE of your choice. I prefer Visual Studio Code for its versatility and user-friendly interface.
Install node.js into your system
What Are React Hooks?
Hooks are special functions used in React functional components. A lifecycle update is possible thanks to a unique feature they have. It is simpler to manage state and side effects within functional components thanks to React Hooks, which provides a more simple method to create React components.
Why learn React Hooks?
Code reuse: Hooks encourage code reuse by letting you share stateful functionality among several components. With custom hooks, you can turn reusable functions into common logic, minimizing code duplication and enhancing maintainability.
Improved Function Components: Hooks allow you to use functional components instead of class components in most cases. Functional components are often easier to read, write, and test. By mastering React Hooks, you can unlock the full potential of functional components and reap their benefits.
Enhanced Productivity: React Hooks make it easier to manage component state and lifecycle events by giving developers a standard and user-friendly API. This simplification allows you to concentrate on developing features and producing high-quality applications more quickly because it saves time and effort.
Simplicity: React components manage state and side effects more simply and directly with React Hooks than with conventional class-based components. Your development process will be more effective and fun using hooks since they let you write cleaner, more succinct code.
Learning: React Hooks makes learning React easier and more pleasurable by simplifying the development process. They take away the difficulties that come with class components, making React development easier for newcomers.
By leveraging hooks, developers can easily incorporate lifecycle-aware behavior into their functional components, making them more powerful and flexible.
Importance of React hooks in simplifying React programming
React Hooks facilitates organized code, allowing developers to place related stateful logic and side effects within individual hooks. This uplifts code organization and modularity, thus making React components simpler to understand, test, and maintain. Additionally, these hooks can be extended and reused across the application's multiple components - thereby improving reusability while lowering duplication of efforts.
Hooks, such as useEffect(), provide developers with a streamlined approach to handling side effects. These effects may include data fetching and subscriptions. Hooks offer the benefit of separating concerns into clearer components, thus replacing the complex lifecycle methods of traditional class components. This results in cleaner code and improved readability.
React Hooks enable performance optimization through the use of hooks like useReducer() and useContext(). These hooks cache functions and values, thereby reducing unneeded re-rendering and enhancing application efficiency.
Commonly React hooks use in programming
i. useState() Hook
The useState() hook in React is an important library for managing data over time within your application's components. It takes two parameters, a current value, and the updated value, and can be used to manage multiple types of data such as arrays, objects, numbers, strings, booleans, or null as the initial input. This hook in React is specifically crafted for building reactive applications. It automatically triggers updates to the user interface whenever the state undergoes a change, guaranteeing a consistently up-to-date display. This seamless integration empowers users to enjoy a dynamic and fluid experience while interacting with your application or observing any other modifications.
It must be declared at the top of your React app and should only be used within functional components for optimal performance.
example
import {usestate} from 'react'
//synatax
const []=useState()
// variable stored in the useState()
const [text, setText] = useState(' obi is a boy');
Benefits of useState() hook
It provides a helpful way to readably keep track of state changes throughout your codebase.
React's useState() hook makes state management incredibly simple. Rather than relying on complicated class components, this straightforward syntax allows you to easily manage state within functional components.
The useState() hook makes initializing state variables simple and straightforward. With it, you can define your component's initial state smoothly, without using complicated setup steps or lifecycle methods.
The useState() hook promotes the principles of immutability, helping developers to manage their data properly and avoid unexpected side effects. By creating a new state object or value each time a change is needed, developers can ensure that data is handled correctly and avoid unexpected errors.
The useState() hook makes it so state management logic can stay contained in the same component, which greatly improves the readability of code and reduces the mental effort required to understand what's going on. This helps keep your codebase cleaner and easier to maintain.
example showing how it is used
import React, { useState } from 'react';

const UseStateContainer = () => {
const [text, setText] = useState('obi is a boy');

const handleClick = () => {
setText('julia is a girl');
};

return (
<div>
    <h1>{text}</h1>
    <button onClick={handleClick}>show text</button>
</div>
);
};

export default UseStateContainer;
ii. useReducer()
React provides developers with a convenient built-in hook known as useReducer(). This powerful hook allows the utilization of reducer functions for efficient state management within functional components serving as a viable alternative to useState().
useReducer() becomes particularly valuable when handling complex state logic or situations where multiple values need to be updated simultaneously. It simplifies the process of managing and updating states, making it a valuable tool in React development.
In order to utilize the useReducer() hook in React, it requires two fundamental :
A reducer function: This function is responsible for overseeing state changes based on dispatched actions. It accepts both the present state and dispatched action as inputs and produces a fresh state as its output.
An initial state: This state serves as the starting point of your application's state prior to any dispatched actions. It establishes the initial values or state of your application.
Here's an example of how the useReducer() hook can be used:
import React, { useReducer } from 'react'

const reducer = (state, action) => {
  switch (action.type) {
    case "INCREMENT":
      return { count: state.count + 1, showText: state.showText }
    case "toggleText":
      return { count: state.count, showText: !state.showText }
    default:
      return state
  }
}

const UseReducer = () => {
  const [state, dispatch] = useReducer(reducer, { count: 0, showText: true })

  return (
    <div>
      <h1>{state.count}</h1>
      <button onClick={() => {
        dispatch({ type: "INCREMENT" })
        dispatch({ type: "toggleText" })
      }}>Click me to count and show</button>
      {state.showText && <p>Obi is a boy</p>}
    </div>
  )
}

export default UseReducer
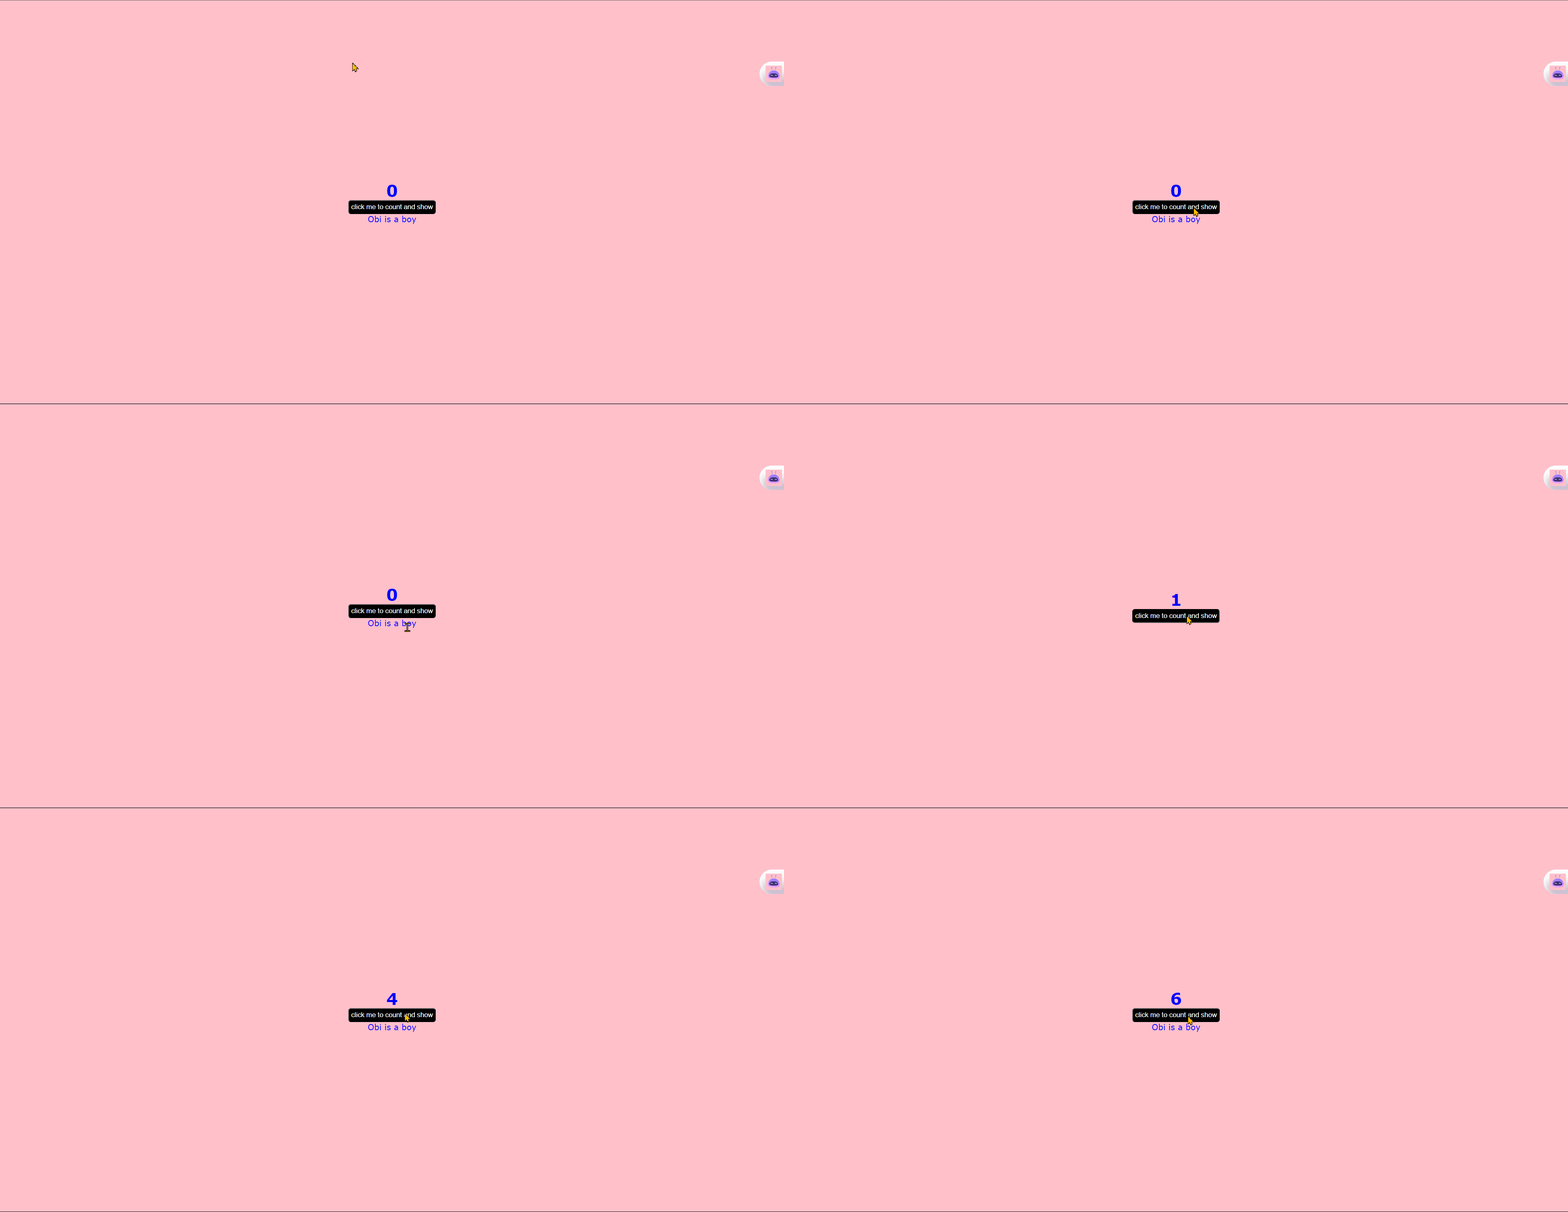
Result

By using useReducer(), you can efficiently manage state changes in a controlled way. It helps organize your code and allows multiple components to share and synchronize state. It promotes code organization and enables effective state management in React applications.
iii. useEffect()
These runs on every render and are commonly used for tasks such as fetching data from an API, performing authentication, or setting up event listeners.
The useEffect() hook accepts two arguments:
A function: This function defines the side effect to be executed. It can contain asynchronous activities, API calls, or any other code that needs to be run after the component renders.
A dependency array ([]): The dependency array is optional but crucial for controlling the execution of the effect. By specifying dependencies in the array, you can guarantee that the effect only activates when certain dependencies change. If the dependency array is empty, the effect will run only once after the initial render.
To avoid infinite loops, dependencies must be included in the array. Without dependencies, the effect will be triggered on every render, causing an infinite loop of execution. Including the necessary dependencies ensures that the effect runs only when those dependencies change, preventing unnecessary re-execution and optimizing performance.
You can effectively manage side effects and make sure they run at the appropriate times without resulting in infinite loops by properly configuring the useEffect() hook with the necessary dependencies.
The syntax for useEffect() without the addition of dependency
import { useEffect } from 'react'

useEffect(() => {

 })
This executes continuously on each render.
The syntax for a useEffect() with the addition of dependency
import {useEffect} from 'react'

useEffect(() => {

 }, [] )
This executes only on the first render. e.g an API call
example of useEffect()
import React, { useEffect, useState } from 'react';

const Container = () => {
const [name, setName] = useState('White');

useEffect(() => {
setTimeout(() => {
setName('Jennifer');
}, 3000);
}, []);

return (
<div>
    <h1>{name}</h1>
</div>
);
};

export default Container;

//settimeout()-optional is used because i want it to change after 3 seconds, the value changes from 'white' to 'Jennifer'
iv. useLayoutEffect()
This hook is similar to useEffect() but with a slight difference. It is especially helpful when you need to find out where an item is before the browser renders it.
The useLayoutEffect() hook is commonly used in cases where you need to perform immediate measurements before the browser paints the changes on the screen.
Syntax
import{useLayoutEffect} from 'react'

useLayoutEffect(()=>{

})
Difference between a useEffect() and useLayoutEffect()
useEffect(): After the component has done rendering and the browser has seen the new UI, It is utilized for operations like data retrieval and page modification.
useLayoutEffect(): Right after the component has finished rendering but before the browser displays the updated UI, it is utilized when determining the size or placement of components on a page.
In simple terms, useLayoutEffect() occurs before the UI updates, whereas useEffect() occurs after the UI updates.
example
import React, { useLayoutEffect, useEffect } from 'react';

const UseLayout = () => {
 useLayoutEffect(() => {
    console.log('Use Layout Effect');
  },[]);

  useEffect(() => {
    console.log('Use Effect');
  }, []);
return (
    <div></div>
  );
}

export default UseLayout;
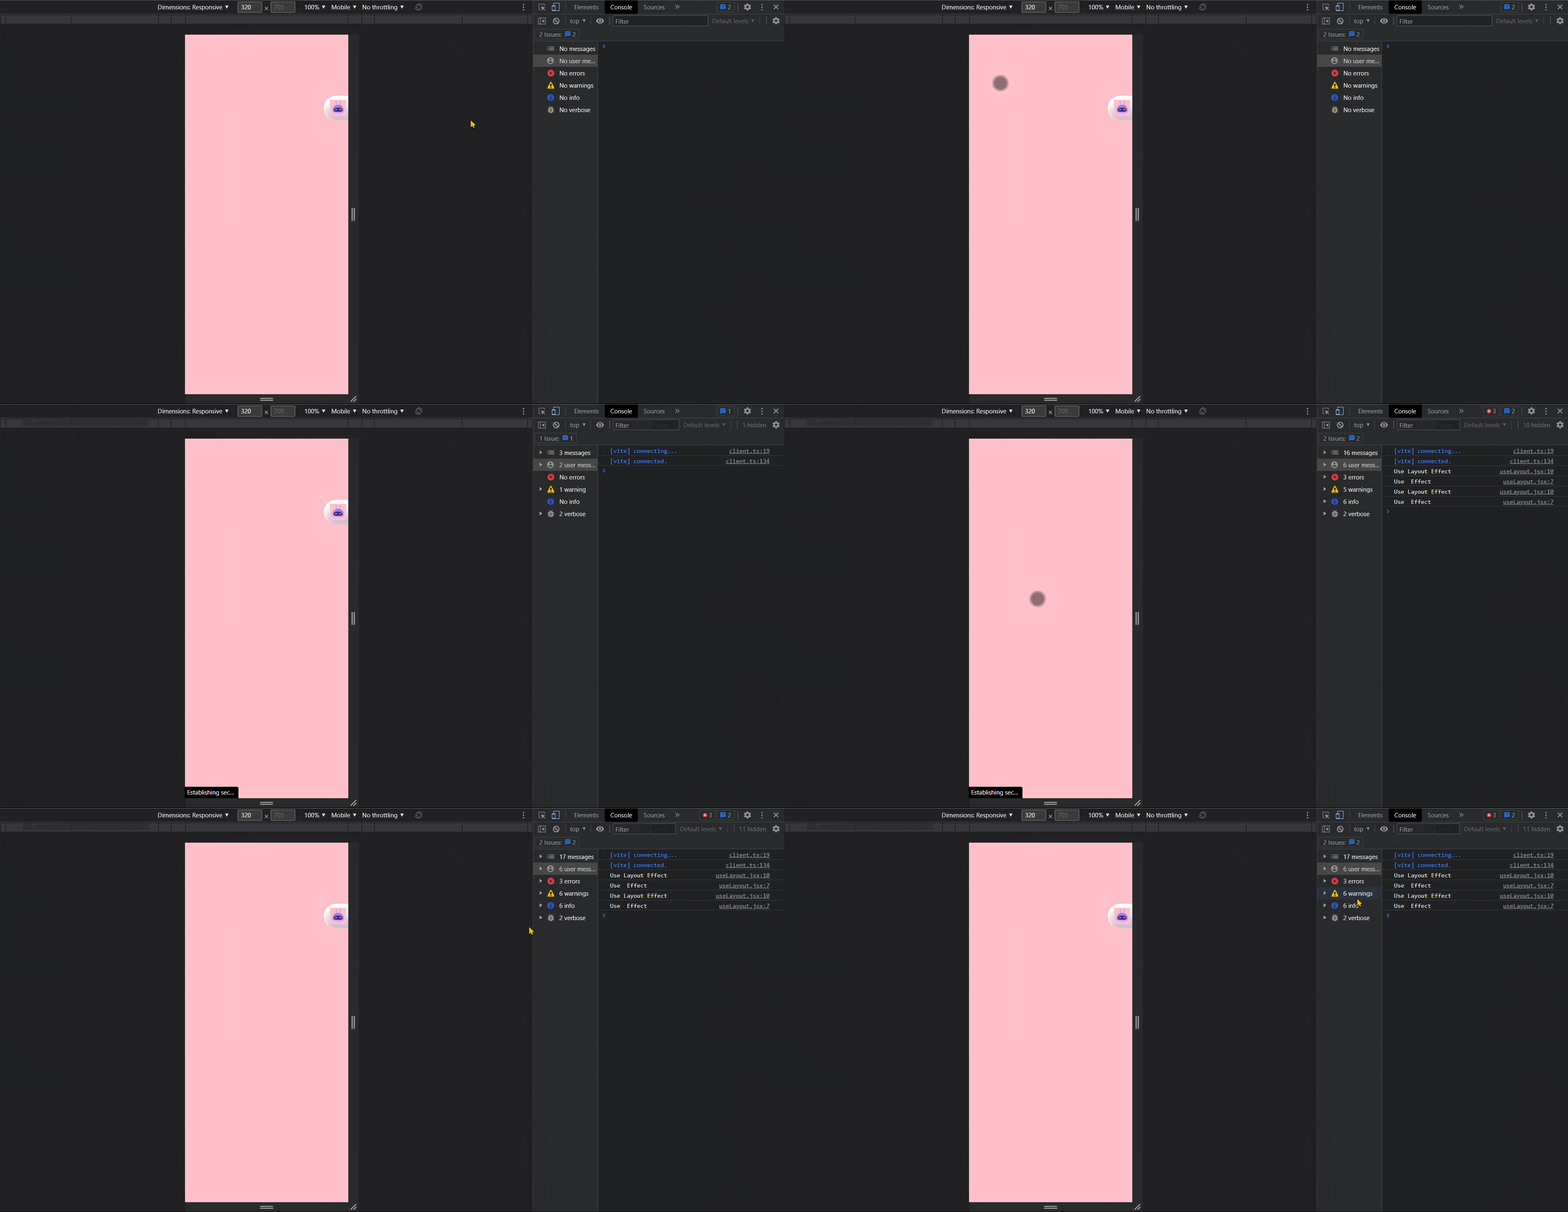
Result

In the code snippet provided, the useLayoutEffect() is placed after the useEffect() hook, but it will still execute first due to the nature of how React handles these two hooks, the useLayoutEffect() hook will always run first it does not matter the position in your IDE. By observing the order of the console logs, you can see that the useLayoutEffect() hook indeed runs before the useEffect() hook.
Let's consider a practical example where we'll examine the execution order of the useLayoutEffect() hook before the useEffect() hook.
In this example, we utilize both hooks to determine which one will execute first.
import { useEffect, useLayoutEffect, useRef } from 'react';

const UseLayout = () => {
  const inputRef = useRef(null);

  // using the useEffect
  useEffect(() => {
    inputRef.current.value = 'hello';
  }, []);

  // using the useLayoutEffect
  useLayoutEffect(() => {
    console.log(inputRef.current.value);
  }, []);

  return (
    <div>
      <input type='text' ref={inputRef} value="greetings" className='input'/>
    </div>
  );
};

export default UseLayout;

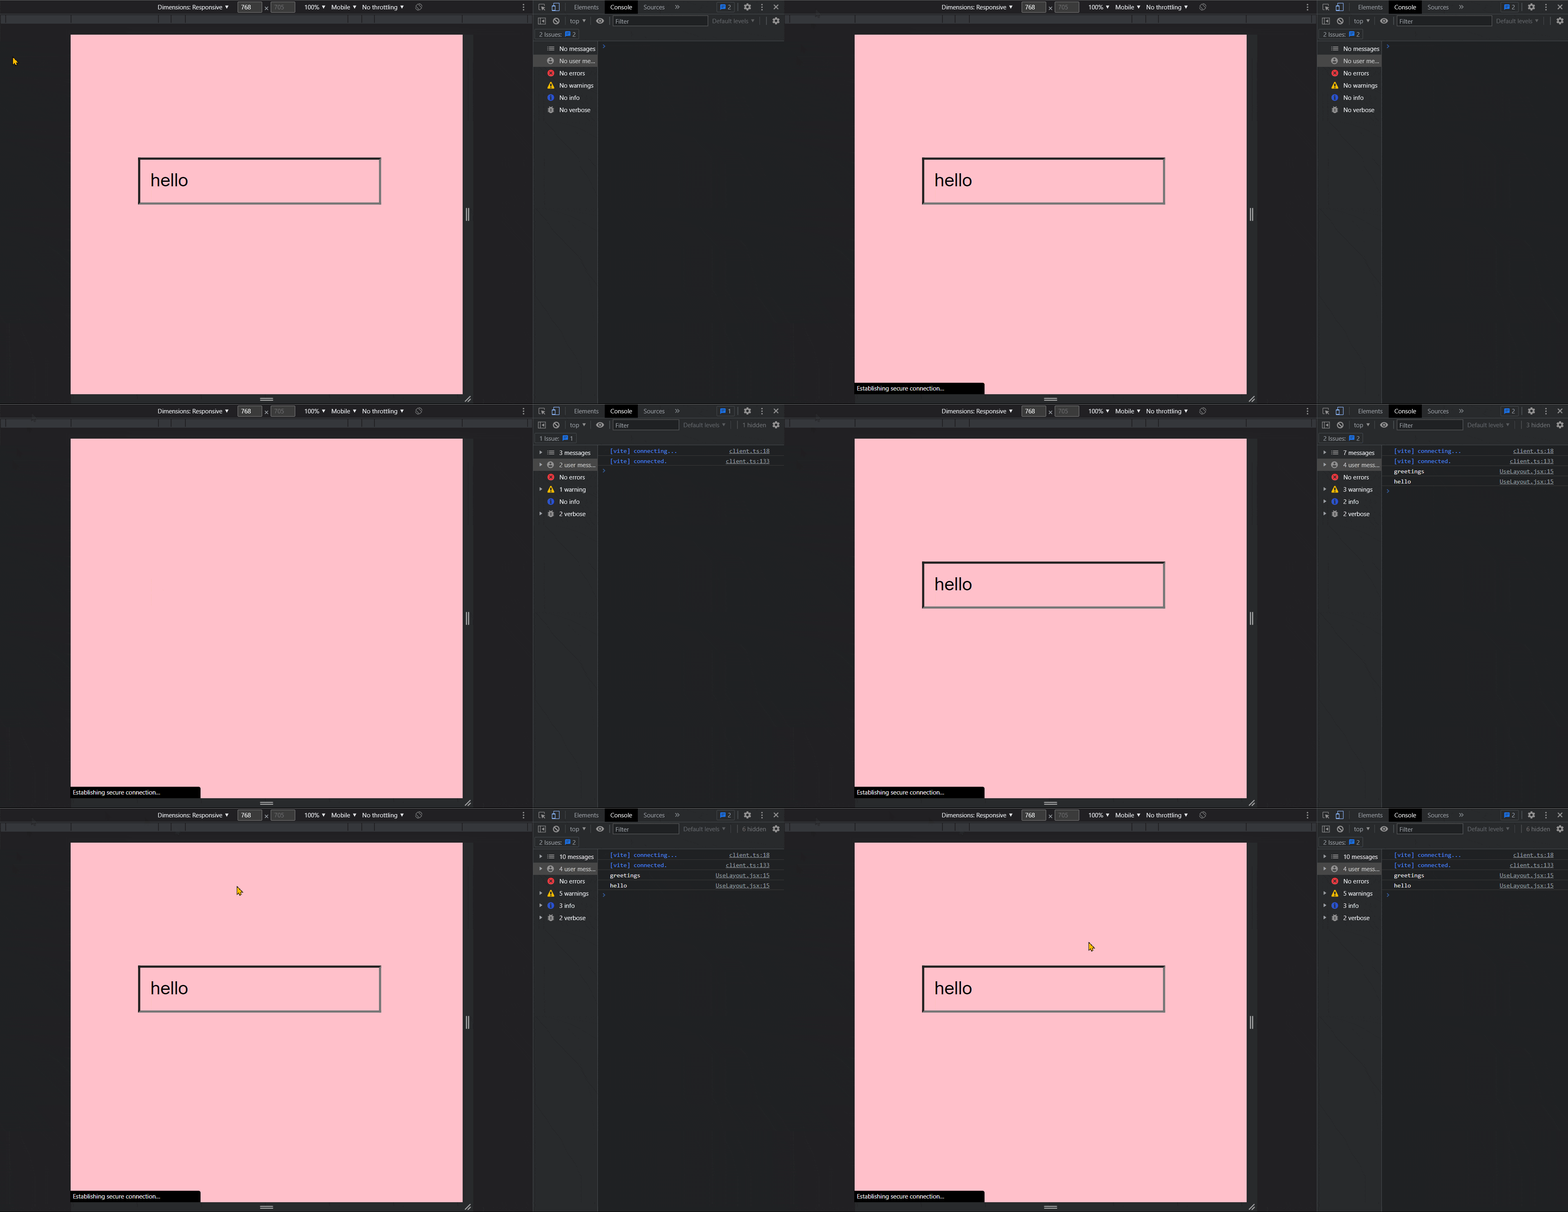
If observed closely, the useLayoutEffect() was executed first for a brief moment, and despite being written second in the IDE, the initial value at the input appeared as the first output in the console then hello.
v. useParam()
React Router, a popular routing package for React applications, comes with the built-in functionality of the useParam() hook. Retrieving URL parameters from the current route is its goal.
When a URL contains a dynamic segment or parameter, such as /users/:id, the useParam() hook can be used to retrieve the parameter's value, which in this case is id. This hook is frequently used when working with the data of specific objects or when carrying out operations based on parameter values.
In order to use the useParam() hook, it is necessary to install and import the react-router-dom package. This package provides components and hooks that are required for implementing routing in React applications.
npm install react-router-dom@6
Example of how to use the useParam() hook to retrieve a single item based on an ID parameter using React Router version 6:
Ensure that react-router-dom@6 is installed into your project.
In your root file (e.g., App.js or index.js), set up the router and define the routes. Let’s assume we have a route that leads to a specific item using its ID:
import { BrowserRouter, Route, Routes } from 'react-router-dom';
import Details from './Details';

function App() {
  return (
    <BrowserRouter>
      <Routes>
        <Route path="/item/:id" element={<Details />} />
      </Routes>
    </BrowserRouter>
  );
}

export default App;
By installing and implementing the provided example first, you enhance the user-friendliness of your application. This implementation enables users to effortlessly navigate to the detailed information of a specific item by simply clicking on it.
The id parameter value may now be directly retrieved from the URL inside the ItemDetails component by utilizing the power of the useParam() hook. This gives you access to the particular ID that was clicked and lets you utilize it to get information about the associated object or carry out any other actions you choose.
- Now, in the
ItemDetailscomponent, you can use the useParam() hook to access the ID parameter from the URL:
import { useParam } from 'react-router-dom';

function Details() {
  const {id} = useParam('id');

  // Use the 'id' to fetch the item details or perform other actions

  return (
    <div>
      <h2>Item Details - ID: {id}</h2>
      {/* Render the item details */}
    </div>
  );
}

export default Details;
vi. useRef()
This hook allows us to directly target DOM nodes. It provides a simple way to manipulate the DOM, similar to using document.getElementById vanilla JavaScript. Instead of manually accessing DOM information, useRef() simplifies the process in React.
Let's consider a form with an input field and a submit button to illustrate the useRef() hook. You may quickly get a reference to the input field and readily access or edit its value by using the useRef() hook.
Here's an example of how you can utilize the useRef() hook:
import React, { useRef } from 'react';

const UseRef = () => {
  const inputRef = useRef(null);

  const handleSubmit = (e) => {
    e.preventDefault();
    // Access the input value using inputRef.current.value
    console.log(inputRef.current.value);
    // ... do something with the value
  };

  return (
    <form>
      <input type="text" className="input" ref={inputRef} />
      <br />
      <br />
      <button type="submit" className="btn" onClick={handleSubmit}>submit</button>
    </form>
  );
}

export default UseRef;
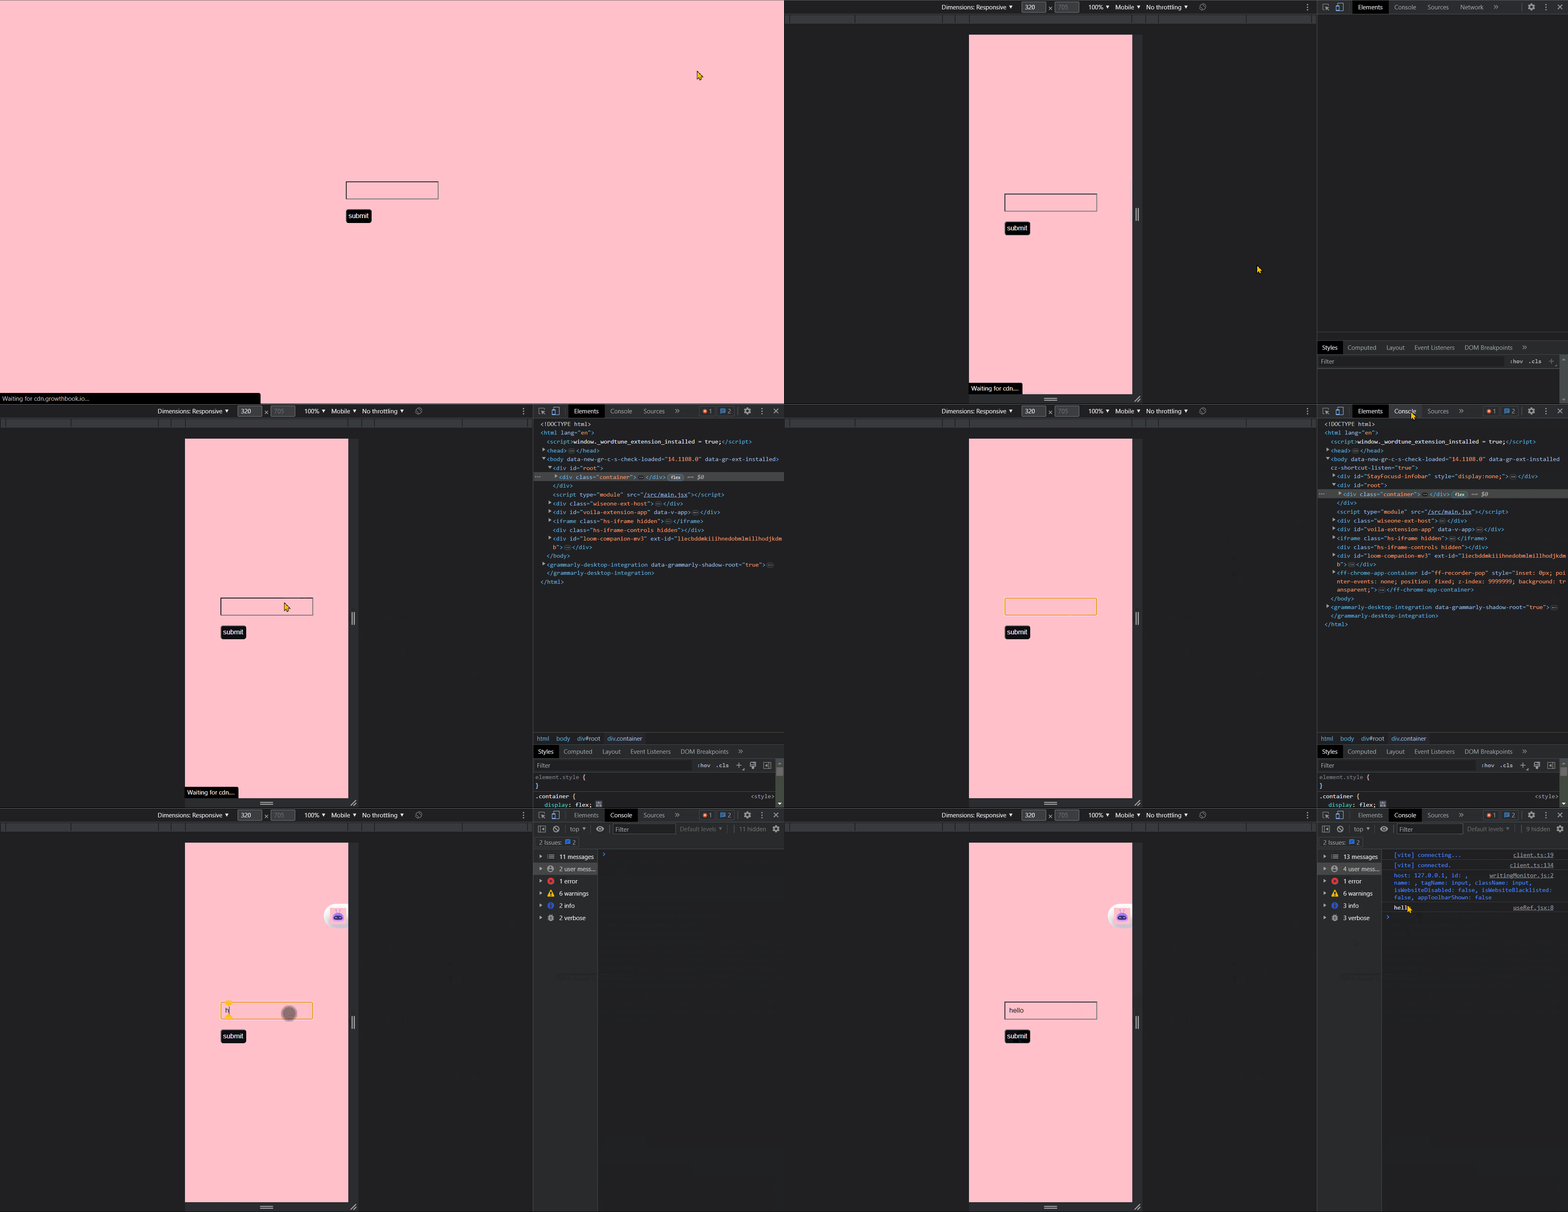
Result

In the example above, the useRef hook is used to create a reference to the input element. The handleSubmit function is called when the form is submitted. The input element is assigned the reference using the ref attribute, allowing easy access to its value using inputRef.current.value.
vii. useNavigate()
useNavigate() is a function provided by React Router that allows you to navigate programmatically within a React application. It replaces the older useHistory() function and is available in react-router-dom version@6. It provides a simple way to navigate to different routes or URLs based on certain conditions or user interactions, such as form submissions or button clicks.
example of how it should be used
import React from 'react';
import { useNavigate } from "react-router-dom";

const About = () => {
  const navigate = useNavigate();

  return (
    <>
      <h1>About</h1>
      <button onClick={() => navigate("/")}>click me</button>
    </>
  );
};

export default About;
With the useNavigate() function enables direct routing to the homepage without the need for explicit linking. It provides a convenient way to navigate programmatically within a React application.
viii. useContext()
The useContext() hook in React enables you to efficiently manage the global state of your application by sharing data from a parent component with its child components. This approach streamlines the process of accessing shared data and eliminates the necessity for multiple layers of components. By using a "context" as a data container, useContext() makes it simple for multiple components in your application to access this shared data.
Let's say we have a file and we need to pass a property(prop) to another file.
Example without the useContext()
UseContext.jsx file
import { useState } from "react"
import Login from "./Login"
import User from "./User"

const UseContext = () => {
  const [userName, setUserName] = useState('')
  return (
    <div>
      <Login setUserName={setUserName} />
      <User userName={userName} />
    </div>
  )
}

export default UseContext
Login.jsx
import PropTypes from 'prop-types';
const Login = ({ setUserName }) => {
    return (
        <form>
           <input type='text' onChange={(e)=>setUserName(e.target.value)} />
        </form>
    );
};

Login.propTypes = {
    setUserName: PropTypes.func.isRequired,
};
export default Login;
User.jsx file
import PropTypes from 'prop-types';

const User = ({ userName }) => {
    return (
        <div>
            <h2>Goodmorning {userName}</h2>
        </div>
    );
};

User.propTypes = {
    userName: PropTypes.string.isRequired,
};

export default User;
N.B In order for the property(prop) to function properly, I needed to install prop.validation library for prop validation.
Here is an example using useContext()
using the useContext() you don't need to pass the prop
Before using the useContext() hook, you must first import it from the React library and define the context in a separate file. This allows you to use the context and its shared data in other files by exporting it.
To make use of the context and its shared data in your application, you must wrap the components that require access to it with the <AppContext.Provider> tag. This provider component is responsible for passing the shared data to the wrapped components and has a value attribute that takes the prop.
UseContext.jsx file
import { createContext, useState } from "react"
import Login from "./Login"
import User from "./User"

 export const AppContext = createContext(null)
const UseContext = () => {
  const [userName, setUserName] = useState('')
  return (
    <AppContext.Provider value={{userName, setUserName}}>
      <Login />
      <User />
    </AppContext.Provider>
  )
}
export default UseContext
Login.jsx file
import { useContext } from 'react';
import { AppContext } from './UseContext';
const Login = () => {
  const { setUserName } = useContext(AppContext);
    // Rest of the component code

    return (
        <form>
      <input type='text' onChange={(e)=>setUserName(e.target.value)} className='input' />
        </form>
    );
};

export default Login;
User.jsx file
import { useContext } from "react";
import {AppContext} from './UseContext'

const User = () => {
  const {userName}=useContext(AppContext)
    return (
        <div>
      <h2> Goodmorning {userName}</h2>
        </div>
    );
};

export default User;
Result

Conclusion
State management in React has been transformed by React hooks, which make it simpler for functional components. They have made direct state control within components possible and removed the need for complicated lifecycle methods. UseState(), useEffect(), and useContext(), three crucial hooks, have made it simpler to maintain state and execute side effects. Hooks have improved component composition, encouraged code reuse, and clarified logic, making React more user-friendly and efficient overall. Hooks have also accelerated the creation of hooks-based libraries and enhanced code structure.
Resource
Here are some helpful resources to enhance your understanding of React and Hooks:
Thank you for reading 💖

